Tuesday, August 30, 2011

XCode 4 says "requires Max OS X 10.6.6" when tried to install on Lion

You got to be kidding me... Tried to install XCode 4 on Lion (10.7.1), and it says "iPhone SDK requires Max OS X 10.6.6 - to install the iOS SDK you must quit the installer and upgrade to Max OS X 10.6.6"...

Yeah right, luckily Apple now offers XCode 4.1 for Lion free - I guess this is another incentive to encourage all developers to upgrade to Lion?

Only trouble is, another huge 4GB download...

MacFuse doesn't work on OS X Lion??

Just received my new 13" MacBook Pro - running OS X 10.7.1 Lion. Was installing NTFS-3G plus MacFuse on it to access my NTFS external UBS drives.

But I keep getting this error as shown below: "dyld: Library not loaded: /usr/local/lib/libfuse.2.dylib Reference from: /usr/local/bin/ntfs-3g Reason: image not found"


When I then check the status of MacFuse it says "MacFUSE does not appear to be installed" and can't check for Updates.

Did some search and found this post saying:


MacFUSE:
The original MacFUSE project is no longer under development. Amit, the
author, has moved on to a closed source version [NuFS] that you can license.
There are a variety of updates to this code base that have been distributed
to get support for Lion and 64-bit Snow Leopard, use them at your own risk.

OSXFUSE [https://github.com/osxfuse/]:
This is a direct descendent of MacFUSE being lead by Erik Larsson and
Benjamin Fleischer - it properly supports Lion [as of the 2.3 branch] and is
actively developed. It should largely "just work" if you're already using
MacFUSE. You can download it from Github - presumably future releases will
live at http://osxfuse.github.com

Fuse4X [http://fuse4x.org/]:
MacFUSE is notably "not fuse" - in that largely mimics but does not
replicate FUSE interface on Linux. Fuse4X descends from MacFUSE but aims to
"be fuse" for the Mac and given that, it no longer stands as a pure
replacement for MacFUSE - but intends to provide a MacFUSE compatibility
layer eventually. It is being actively developed by Anatol Pomozov
[https://github.com/fuse4x].


Great, will need to learn about this new thing called "OSXFUSE" then, hope it's not too complicate/difficult...

[Update] The unofficial package mentioned in this post which points to this download seems to work for me. Although at the beginning it reports an error about not getting response within 15 seconds...


[Update 2] Thanks to info from "anonymous" (See below), I applied the workaround following the information from https://gist.github.com/1100318 and I now no longer gets that 15 second error. Thanks!

Friday, August 26, 2011

Neon Label Test

Saw quite a lot of games using fancy label/text/drawings with nice "neon" effect. Searched on the net for a while and found 2 sites ( Cocoanetics and stackoverflow.com info by Brad Larson) which have some useful information. So I combined the 2, plus some colour info from Visibone, and I was able get some nice labels with Neon effect working.

But I think that's not enough. Mainly because the effect of these neon labels will also depend on the background colour/image underneath.  So I modified one of my old projects (the "project#2" mentioned in this post, based on Chapter 7 example code from the iPhone Application Development for iOS4 Visual QuickStart guide book) a bit. It used to have 3 little squares which you can drag it around. I changed it into 12 different coloured squares, with the different Neon labels at the front. So you can easily change the background colour by dragging different square behind the neon coloured text.

When the project starts, you will see something as below. You will notice each colour was displayed twice. The reason for that is, the 2 links I mentioned above used slightly different techniques. The Cocoanetics one defined 3 colours (insideColor, outlineColor, blurColor) with different "alpha" value. So I created 2 objects (both extending UILabel) one accepting UIColor, while the other accepts R/G/B value separately so that the code can have different alpha value specified (this is because I can't change alpha value of UIColor?). The top 5 labels uses "NeonLabel" while the bottom 5 uses "NeonLabelRGB" object, have a look carefully and see if you can spot the differences.


In my opinion, although the RGB method indeed creates a slightly better blurring effect, it's too much trouble to have to pass R/G/B value on every call. I still prefer the easier way to make my life easier...

After you dragged a few boxes around, you will get a slightly messier screen as below for you to compare the effect of different coloured neon label on different coloured background.
Hope you find this project interesting!


Source of the Neon Label Test project


Improved ListAllFonts

I was playing around with the "ListAllFonts" project I had before, but noticed a problem: although it's quite handy to have al the font names available, it's not much use unless I can visually see what each font looks like. Changing the font of a label one font name at a time is just too dumb...

Also added 2 new things just learned: block-code and UIScrollView.

A simple block-code to show font and automatically increase the "y" value is as below. It accepts 3 parameters: the view (UIScrollView), the string to be displayed and the font name.


void (^showFonts)(UIView *,NSString *,NSString *) = ^(UIView *uView, NSString *msg,NSString *fName) {
    UILabel *tmpLabel = [[UILabel alloc] initWithFrame:CGRectMake(xx, yy, uView.frame.size.width, fontSize*2)];
    [tmpLabel setText:msg];
    [tmpLabel setFont:[UIFont fontWithName:fName size:fontSize]]; 
    [tmpLabel setTextColor:[UIColor blackColor]];
    [tmpLabel setBackgroundColor:[UIColor clearColor]];
    [tmpLabel setShadowColor:[UIColor yellowColor]];
    [tmpLabel setOpaque:NO];
    [tmpLabel setAlpha:1.0];
    [uView addSubview:tmpLabel];
    [tmpLabel release];
    yy+=fontSize*1.5;
    
};


The UIScrollView is also quite simple, I was stuck with the "content size" for a while - I set it to be the same as current screen size in the beginning and was scratching my head wondering how come it wouldn't scroll??  Well, of course it won't, unless I set it to a much bigger size....


    scrollView = [[UIScrollView alloc] initWithFrame:CGRectMake(0, 0, screenWidth, screenHeight)];   
    [scrollView setScrollEnabled:YES];
    [scrollView setContentSize:CGSizeMake(screenWidth,(1000-screenHeight)*25)];
    [self.view addSubview:scrollView];
    [scrollView release];


The result is quite nice, as shown below.

And yes, with the limited display area, how could I forget about the landscape mode? So I also changed it a bit so that it automatically redisplay the content if the device orientation changed:

Note: hasn't got time to run through instruments to check for memory leak or other problems - please let me know if you noticed any.

Enjoy!

Source to V2 of ListAllFonts

[Update 05/04/2012] Found this web site which listed out all iOS fonts for iOS5, which you might also find it handy.

[Update 03/05/2012]
I run it with iPhone 4.3 simulator, it listed 42 different fonts.
Then run it with iPhone 5.0/5.1 simulator, both listed 58 different fonts.

Wednesday, August 24, 2011

Don't always need an UILabel to display a NSString

I always thought to display a NSString on a view, you need to create a UILabel. But from Apple's "iOS Development Guide", looks like this might not be the case. The "Hello World" example in Page 23 of the guide shows some code (Listing 1-1) as below to display a NSString directly using "drawAtPoint", which is quite interesting...

- (void)drawRect:(CGRect) rect { 
    NSString *hello = @"Hello, World!"
    CGPoint location = CGPointMake(10, 20); 
    UIFont *font = [UIFont systemFontOfSize:24.0]; 
    [[UIColor whiteColor] set]; 
    [hello drawAtPoint:location withFont:font];
}

I guess the downside of doing it like this is, you can't reference back to the same NSString later to perform further actions, such as change content, change location, hide the text, ...etc.

Saturday, August 20, 2011

Better way to handle switching between multiple view controllers?

Was looking at this sample code from Apple called "AlternateViews" which demonstrates the switching between 2 View Controllers when the device orientation changes.

I found a few interesting things about the code:

1. The "PortraitViewController" is loaded first, it then loads the "LandscapeViewController" in the viewDidLoad() of "PortraitViewController".

2. There's this new piece of code which I never seen before (as below) using NSNotificationCenter, which sets to call "orientationChanged" method when the orientation changed.


[[UIDevice currentDevice] beginGeneratingDeviceOrientationNotifications];
[[NSNotificationCenter defaultCenter] addObserver:self selector:@selector(orientationChanged:)  name:UIDeviceOrientationDidChangeNotification object:nil];


3. When the orientation changed to Landscape, it calls the following "presentModalViewController" code to switch to the "LandscapeViewController"


[self presentModalViewController:self.landscapeViewController animated:YES];


4. When the orientation changed back to Portrait, it calls the following code to switch back.


[self dismissModalViewControllerAnimated:YES];


This way of switching between multiple view controllers is new to me, plus the way the change of orientation been handled is quite interesting too. Will certainly give it a try on some of my projects.

Friday, August 19, 2011

Minutes to Midnight - rotatable version

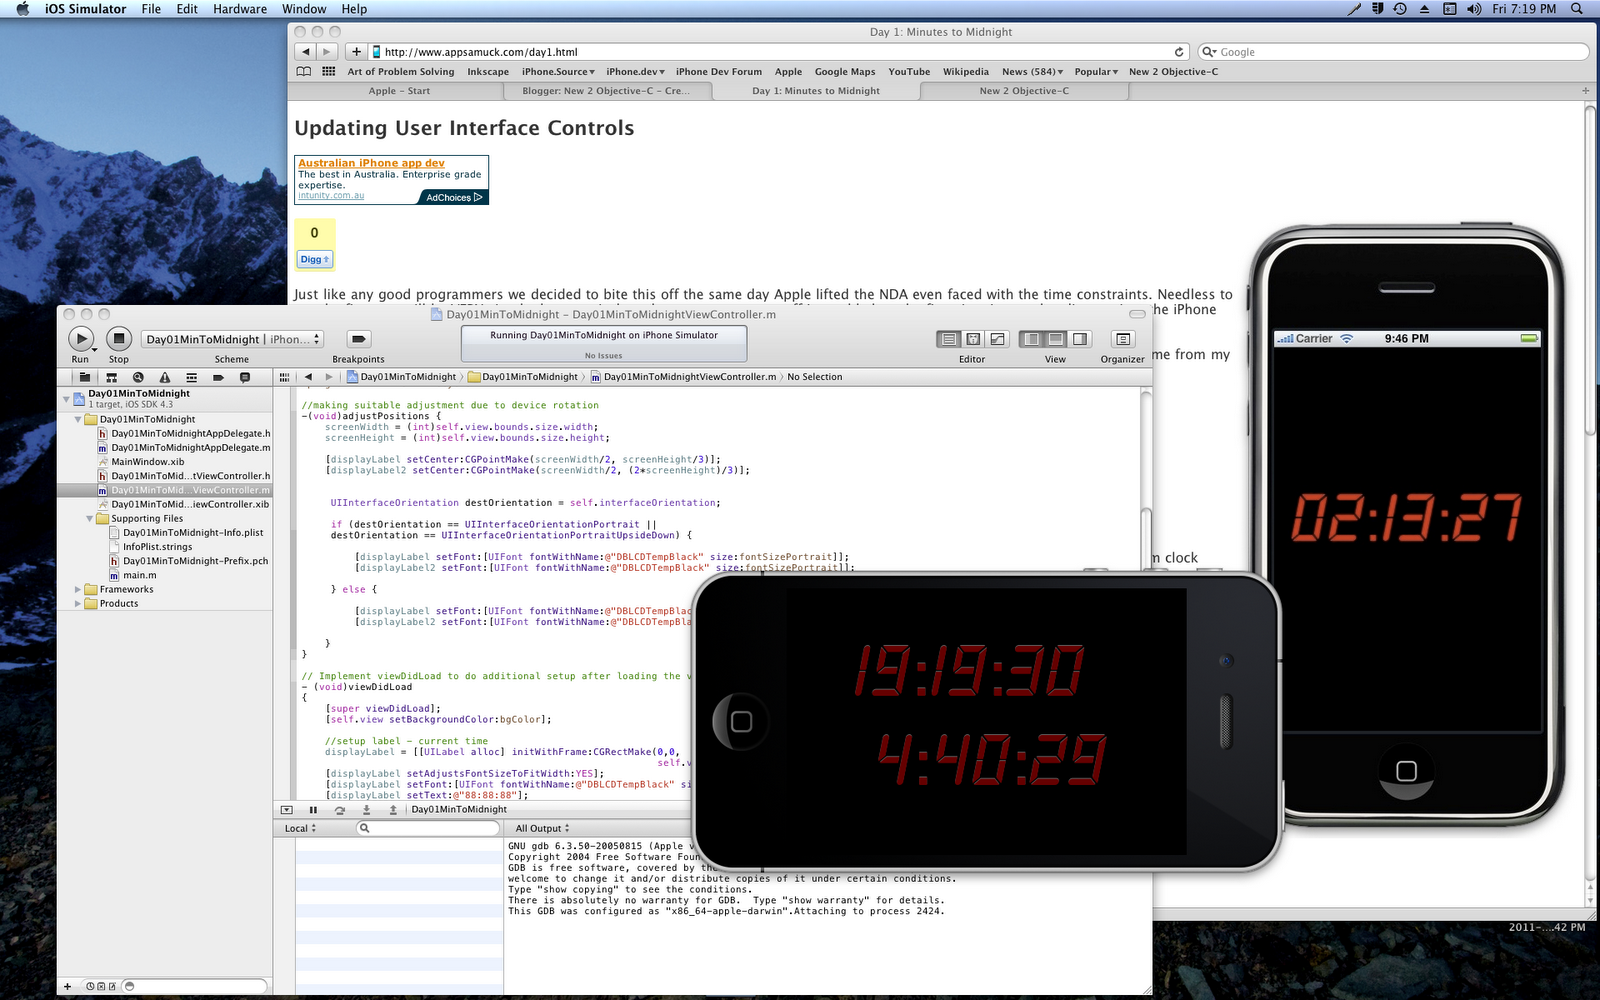
The 3rd and 4th project with AppsAmuck wasn't that interesting. So I updated the "Minutes to Midnight" project with rotation capability.


Now the display automatically adjusts it's location when the device rotated. Source code available below.

Code for Rotatable Minutes to Midnight