At the beginning....
At first I was working on a proof of concept game, which is multi-levelled and I started thinking about how to create an "Angry Bird" style multi-level sliding grid. To avoid reinventing the wheel, I found this page from Apptinker blog which adds extra labelling for each level icons on top of Brandon Reynold's excellent piece of work (video shown below).
Some extras on top ....
However, after some testings, I found a few things that can be further improved:
(1) It's for iPhone only, doesn't cover iPad or Universal projects that well
==> need to check device type and use device specific parameters/images
(2) All level icons are clickable, which might not be very practical. As normally at the beginning, only the first one or few levels are enabled, rest all locked. Player has to pass the level (or pay extra money or click on ads or install other apps, ...etc to get credits) to unlock other levels. So it should have 2 types of level icons - locked and unlocked, and only those unlocked ones are clickable.
==> use different icons for locked/unlocked level types, plus extra field to keep track if each level is locked or not.
(3) Say if there are 3 x 6 level icons per page, and your total number of levels (e.g. 45) is not the multiples of 18 (e.g. 18, 36, 54, 72), scrolling to the last page (using 45 as example, that will be page 3 of clickable level icons) doesn't work.
==> add extra invisible icons (opacity=0) at the end to make the total number of all level icons equivalent to multiples of the number of total icons per page (45 + 9 invisible ones = 54 in total)
(4) From the level select page, can not return back to main menu page (the page before this page)
==> add extra HUD (Heads Up Display) layer with a home icon
Issues resolved, yeah!
I spent some time and finally got all these issues resolved. Also exchanged a few emails with readers about displaying splash page and localisation (supporting multiple languages) while working on this.
A light bulb appeared on my head, and....
I suddenly realised there's a need for a simple multi-level template which covers:
(a) splash page,
(b) main menu,
(c) level sliding grid,
(d) a simple popup at the end of each level,
==> if passed, unlock next level and show option to proceed to next level, replay same level, home or back to level select screen
==> if failed, only show option to replay same level, home to back to level select screen
(e) audio (one at splash page startup, one as looping background, a few sound effects, ...etc)
(f) localisation (for icon name and messages)
This should be handy to beginners like me, as you then only need to focus on the main game design, fit it into this template (with a bit of work of course), and you got a fully functioning game!
Wonder if there's currently any open source project available for this kind of work? Let me know if you are aware of any!!
Mission accomplished!
I got the first draft of this simple Universal project template sort of completed (link to source available far, far below), some features listed below:
(1) uses Cocos2d V1
(2) include script to run TexturePacker to build 4 ".pvr.ccz" format sprite sheets (iPad SD/HD and iPhone SD/HD) from 2 directories (containing images for iPad HD and iPhone HD) on each build
==> Note that if you only have the free version, you need 4 directories (one each) and have to use other file format which is slower and less efficient
(3) for localisation, includes English, Spanish, Traditional Chinese, Simplified Chinese and Japanese at the moment
(4) keeps track of top score, date top score achieved and number of stars received for each level (stored in NSUserDefaults)
Also have an empty link for Help and another one for GameCenter which I haven't got time to finish yet, will look at that later...
So, what does it look like? Some screen dumps and brief description first...
The application icon name, changes according to the language setting of the device. As the screen below shows, it's defined by "CFBundleDisplayName" inside file "InfoPlist.strings" and there's one for every supported language. Yes, your app can be called "XYZ" in Xcode, "ABC" in App Store, and shows "STU" at the bottom of icon when installed on users' device, they don't have to be the same.


Next, when the app starts, it shows the splash page. All the label/title content read from "Localizable.strings" file. You should get the idea now. The splash page code ("LoadingScene") also plays a short audio, you can use it to announce your company name or some other stuff to greet your users.


Note 1: with the Spanish version on upper right hand side, you can see a common problem - the label is too wide and need to reduce the font size to fix that! Please refer to this post of mine for further info: "Things learned about multi-language"
Note 2: the images with orange background are captured from iPad 2, the green ones are from iPhone 3GS.
Note 3: the blue popup in the middle is because I wasn't signed in to GameCenter, can ignore that.
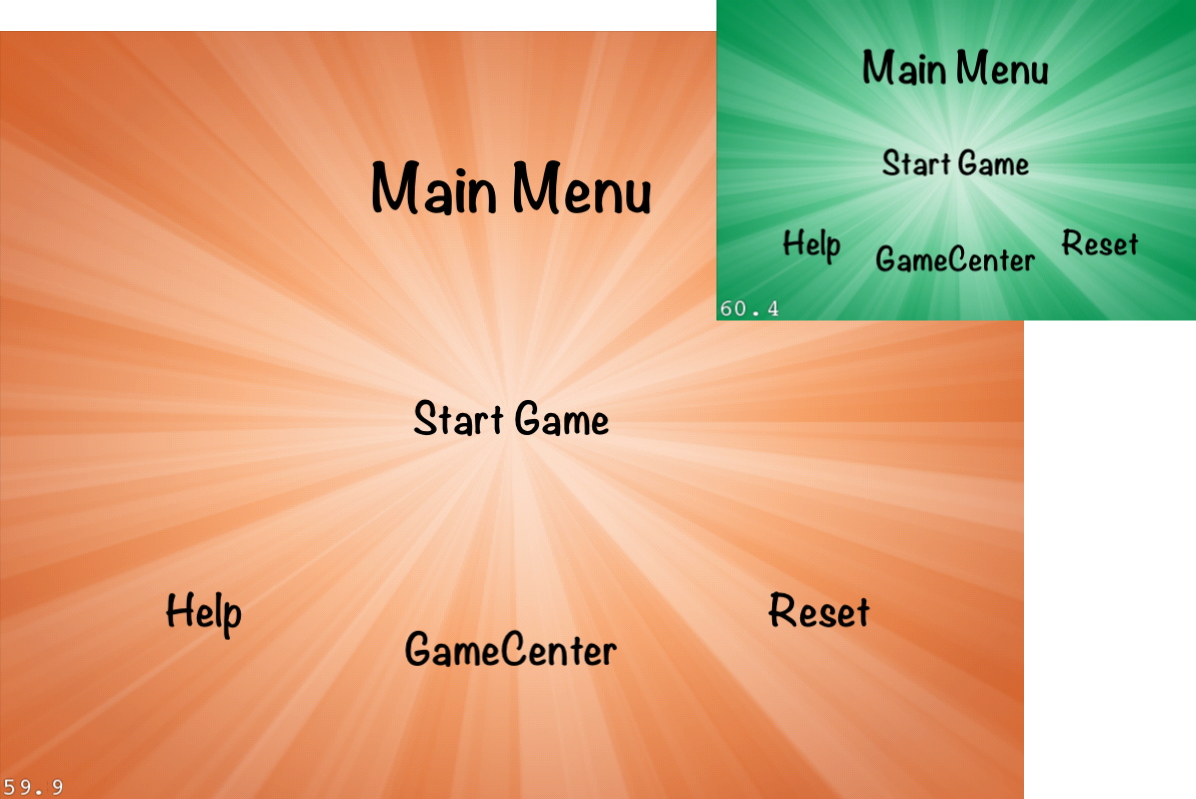
Next is the main page, a bit too simple right? Yes, because I expect you to completely replace this page with a proper one for your game! (Note: latest version in the video was updated with extra Sound On/Off option)
"Help" and "GameCenter" not working yet, "Start Game" will bring you to the level select screen, "Reset" resets all the level data.

Next, the most important part thast most of you would be interested with - the level select screen (sliding menu grid). As you can see the "home" button floats in the HUD layer, doesn't move when you slide between different pages, and only 1st level was unlocked initially. Second one shows the last page - with 9 invisible ones at the back.


Finally the GameLayer - as you are also supposed to replace this with your own game, I quickly built a simply single page test game layer based on Ray Wenderlich's Cocos2D button tutorial to simulate the result of a real game. You can use the lower right hand side buttons to specify how many stars current level received, use the "+", "-" and 3 buttons above to change the score, and click on the middle 2 to pass or fail the game, very simple.

There will be 2 different popups when game ended depending on whether you passed or failed, as shown below:


Don't like the images/screen design? Me too...
Well, I am a developer, not designer... I am only providing a fully functioning "template", would suggest you to get some proper designer to do all the nice looking stuffs if you don't like mine, you are welcomed to change it!!
Short demo video
For those who like to see how it works, a short demo video covering both iPhone and iPad, as it's an universal project. Oops, as it's screen capture by QuickTime, unfortunately no sound... But if you download the source code and run from your Mac, you will get all the sound and background music.
Where is the code?!! Any copyright/left requirement thing?
I only have 2 simple requirements:
1) You have to download both my games and play both of them for a few times (help me to help you more!!)
(a) Where Is It - Smart Kids Edition and (b) Mespfi
2) Optionally, please credit me or provide a link back to this blog either in your App or in your blog.
That's it, simple right? After that you are welcomed to use and change the code in which ever way that suites your needs.
Finally, you can click here (Updated V1.02) (Old Version 1.0 click here) to download the code. When you first run it, TexturePacker will report some errors (as it couldn't find the image files to process), but as the sprite sheets already included it will still work.
If you want to update any images (or fix that error), first you need to download the images, store it somewhere on your local drive, then modify "PackTextures.sh" so that all the path settings match where the images were located. And if you changed any of the image file names, please update the settings in "GameData.h" so that it can be picked up correctly.
I have put most of the changeable settings at the top of "GameData.h", have a look at that first.
Finally, please let me know if you have any problem, any further information required, or if you found any bug or have better ways to improve the project, all comments welcomed!
Thanks, and happy coding!
[Update 24/11/2012]
Thanks to Nick Wilson who pointed out that there's problem when this template runs in iOS 6. I have created a fix, please see this post for further details.
[Update 25/11/2012]
Updated links to source/images to V1.02, history info:
Credit
I used some Starburst Images from Vicki Wenderlich, followed tutorials from Ray Wenderlich for the HUD layer and the test game layer, and used quite a lot of stuffs from Steffen's excellent Cocos2d Book. The nice music is from redhouse91 on freesound.org, I hand-drawn some of the images, some are from OpenClipArt. So like to thank them for that.
At first I was working on a proof of concept game, which is multi-levelled and I started thinking about how to create an "Angry Bird" style multi-level sliding grid. To avoid reinventing the wheel, I found this page from Apptinker blog which adds extra labelling for each level icons on top of Brandon Reynold's excellent piece of work (video shown below).
Some extras on top ....
However, after some testings, I found a few things that can be further improved:
(1) It's for iPhone only, doesn't cover iPad or Universal projects that well
==> need to check device type and use device specific parameters/images
(2) All level icons are clickable, which might not be very practical. As normally at the beginning, only the first one or few levels are enabled, rest all locked. Player has to pass the level (or pay extra money or click on ads or install other apps, ...etc to get credits) to unlock other levels. So it should have 2 types of level icons - locked and unlocked, and only those unlocked ones are clickable.
==> use different icons for locked/unlocked level types, plus extra field to keep track if each level is locked or not.
(3) Say if there are 3 x 6 level icons per page, and your total number of levels (e.g. 45) is not the multiples of 18 (e.g. 18, 36, 54, 72), scrolling to the last page (using 45 as example, that will be page 3 of clickable level icons) doesn't work.
==> add extra invisible icons (opacity=0) at the end to make the total number of all level icons equivalent to multiples of the number of total icons per page (45 + 9 invisible ones = 54 in total)
(4) From the level select page, can not return back to main menu page (the page before this page)
==> add extra HUD (Heads Up Display) layer with a home icon
Issues resolved, yeah!
I spent some time and finally got all these issues resolved. Also exchanged a few emails with readers about displaying splash page and localisation (supporting multiple languages) while working on this.
A light bulb appeared on my head, and....
I suddenly realised there's a need for a simple multi-level template which covers:
(a) splash page,
(b) main menu,
(c) level sliding grid,
(d) a simple popup at the end of each level,
==> if passed, unlock next level and show option to proceed to next level, replay same level, home or back to level select screen
==> if failed, only show option to replay same level, home to back to level select screen
(e) audio (one at splash page startup, one as looping background, a few sound effects, ...etc)
(f) localisation (for icon name and messages)
This should be handy to beginners like me, as you then only need to focus on the main game design, fit it into this template (with a bit of work of course), and you got a fully functioning game!
Wonder if there's currently any open source project available for this kind of work? Let me know if you are aware of any!!
Mission accomplished!
I got the first draft of this simple Universal project template sort of completed (link to source available far, far below), some features listed below:
(1) uses Cocos2d V1
(2) include script to run TexturePacker to build 4 ".pvr.ccz" format sprite sheets (iPad SD/HD and iPhone SD/HD) from 2 directories (containing images for iPad HD and iPhone HD) on each build
==> Note that if you only have the free version, you need 4 directories (one each) and have to use other file format which is slower and less efficient
(3) for localisation, includes English, Spanish, Traditional Chinese, Simplified Chinese and Japanese at the moment
(4) keeps track of top score, date top score achieved and number of stars received for each level (stored in NSUserDefaults)
Also have an empty link for Help and another one for GameCenter which I haven't got time to finish yet, will look at that later...
So, what does it look like? Some screen dumps and brief description first...
The application icon name, changes according to the language setting of the device. As the screen below shows, it's defined by "CFBundleDisplayName" inside file "InfoPlist.strings" and there's one for every supported language. Yes, your app can be called "XYZ" in Xcode, "ABC" in App Store, and shows "STU" at the bottom of icon when installed on users' device, they don't have to be the same.


Next, when the app starts, it shows the splash page. All the label/title content read from "Localizable.strings" file. You should get the idea now. The splash page code ("LoadingScene") also plays a short audio, you can use it to announce your company name or some other stuff to greet your users.


Note 1: with the Spanish version on upper right hand side, you can see a common problem - the label is too wide and need to reduce the font size to fix that! Please refer to this post of mine for further info: "Things learned about multi-language"
Note 2: the images with orange background are captured from iPad 2, the green ones are from iPhone 3GS.
Note 3: the blue popup in the middle is because I wasn't signed in to GameCenter, can ignore that.
Next is the main page, a bit too simple right? Yes, because I expect you to completely replace this page with a proper one for your game! (Note: latest version in the video was updated with extra Sound On/Off option)
"Help" and "GameCenter" not working yet, "Start Game" will bring you to the level select screen, "Reset" resets all the level data.
Next, the most important part thast most of you would be interested with - the level select screen (sliding menu grid). As you can see the "home" button floats in the HUD layer, doesn't move when you slide between different pages, and only 1st level was unlocked initially. Second one shows the last page - with 9 invisible ones at the back.


Finally the GameLayer - as you are also supposed to replace this with your own game, I quickly built a simply single page test game layer based on Ray Wenderlich's Cocos2D button tutorial to simulate the result of a real game. You can use the lower right hand side buttons to specify how many stars current level received, use the "+", "-" and 3 buttons above to change the score, and click on the middle 2 to pass or fail the game, very simple.

There will be 2 different popups when game ended depending on whether you passed or failed, as shown below:


Don't like the images/screen design? Me too...
Well, I am a developer, not designer... I am only providing a fully functioning "template", would suggest you to get some proper designer to do all the nice looking stuffs if you don't like mine, you are welcomed to change it!!
Short demo video
For those who like to see how it works, a short demo video covering both iPhone and iPad, as it's an universal project. Oops, as it's screen capture by QuickTime, unfortunately no sound... But if you download the source code and run from your Mac, you will get all the sound and background music.
Where is the code?!! Any copyright/left requirement thing?
I only have 2 simple requirements:
1) You have to download both my games and play both of them for a few times (help me to help you more!!)
(a) Where Is It - Smart Kids Edition and (b) Mespfi
2) Optionally, please credit me or provide a link back to this blog either in your App or in your blog.
That's it, simple right? After that you are welcomed to use and change the code in which ever way that suites your needs.
Finally, you can click here (Updated V1.02) (Old Version 1.0 click here) to download the code. When you first run it, TexturePacker will report some errors (as it couldn't find the image files to process), but as the sprite sheets already included it will still work.
If you want to update any images (or fix that error), first you need to download the images, store it somewhere on your local drive, then modify "PackTextures.sh" so that all the path settings match where the images were located. And if you changed any of the image file names, please update the settings in "GameData.h" so that it can be picked up correctly.
I have put most of the changeable settings at the top of "GameData.h", have a look at that first.
Finally, please let me know if you have any problem, any further information required, or if you found any bug or have better ways to improve the project, all comments welcomed!
Thanks, and happy coding!
[Update 24/11/2012]
Thanks to Nick Wilson who pointed out that there's problem when this template runs in iOS 6. I have created a fix, please see this post for further details.
[Update 25/11/2012]
Updated links to source/images to V1.02, history info:
// Ver 1.00 - 28/09/2012 First version
// Ver 1.01 - 24/11/2012 Fixed iOS 6 orientation issue
// Ver 1.02 - 25/11/2012 Add background image for iPhone 5 (1136x640), add version number display on Main Menu
Credit
I used some Starburst Images from Vicki Wenderlich, followed tutorials from Ray Wenderlich for the HUD layer and the test game layer, and used quite a lot of stuffs from Steffen's excellent Cocos2d Book. The nice music is from redhouse91 on freesound.org, I hand-drawn some of the images, some are from OpenClipArt. So like to thank them for that.